
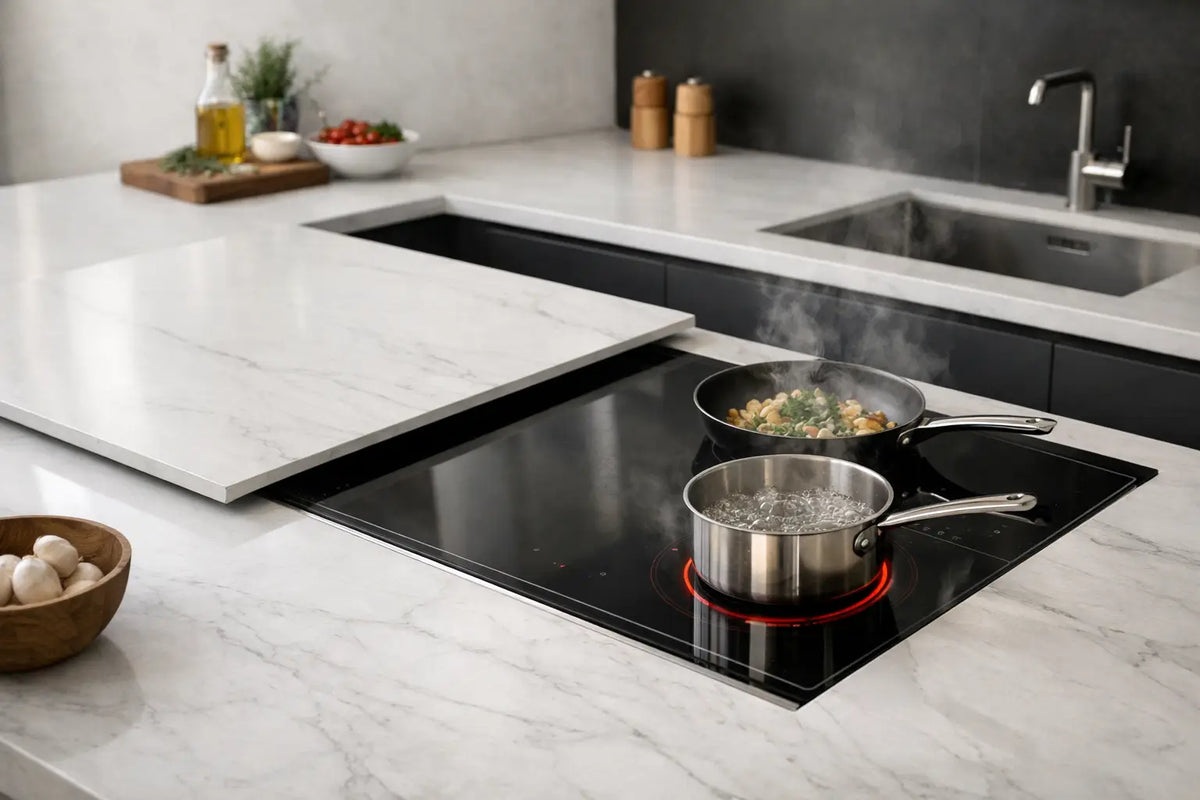
A kitchen island should not lose its best square footage to a row of visible burners. A hidden cooking surface design guide starts with a different idea: let the porcelain countertop remain the visual focus, then place induction technology beneath it. When cooking is finished, the same surface can return to prep space, a serving bar, homework station, or dining table.
That transformation is why through-surface induction belongs in a conversation about architecture, not just appliances. It gives designers and homeowners a way to remove a familiar visual interruption without giving up serious cooking performance. The result is a cleaner plan, more flexible entertaining space, and a countertop that stays cool outside the active cookware area.
Start With the Island’s Real Job
Before selecting a burner count or countertop slab, define how the island will be used on an ordinary Tuesday and during a full house. A family that cooks dinner nightly may need three or four cooking zones. A city kitchen with a separate range may benefit most from one or two hidden zones that expand prep capacity without changing the room’s calm appearance.
The island also needs a clear work pattern. Cooking zones should sit close enough to refrigeration and prep areas to avoid unnecessary steps, but they should not crowd the primary landing area for groceries, platters, and serving dishes. In a large open-plan kitchen, many homeowners place the induction system toward the working side of the island, leaving the seating side entirely open for guests.
This is where invisible induction changes the design conversation. With no raised glass, grates, knobs, or exposed burner circles, you are not forced to treat the island as an appliance first. It can read as a single architectural plane.
Choose Porcelain Before You Finalize the System
A hidden cooking surface depends on the countertop material as much as the induction unit below it. Through-surface systems are engineered for compatible porcelain slabs, not for every stone, quartz, or solid-surface product on the market. Material selection should happen early, before cabinetry is ordered and before the fabricator receives final drawings.
Porcelain is especially compelling because it brings heat resistance, low porosity, stain resistance, and a refined large-format appearance to the project. It is also available in finishes that resemble natural stone, concrete, metal, or dramatic veining without requiring the care associated with many natural materials. For a kitchen intended to work hard and look composed, that combination matters.
Compatibility is specific, not assumed. Slab brand, product line, thickness, reinforcement requirements, and installation method all need verification. A countertop can be beautiful and still be the wrong choice for a through-surface cooking application. Confirm approved porcelain options and technical requirements before purchasing the slab, not after templating.
Plan for the Fabricator Early
Your countertop fabricator needs to understand that the cooking system sits beneath the porcelain, even though there will be no conventional cooktop cutout visible from above. The underside preparation, support details, clearances, and placement must follow the appliance specifications precisely.
Bring the appliance plan to the fabricator, cabinetmaker, electrician, and kitchen designer at the same time. This prevents a common renovation problem: a beautiful island is built, then the project discovers there is insufficient room below the slab for ventilation, wiring, or service access. Early coordination protects both the countertop investment and the installation schedule.
Set the Cooking Zones Around Actual Cookware
Invisible cooking is intentionally discreet, but it should never be hard to use. Cooking-zone placement is usually marked with subtle visual cues or a layout that makes the active positions intuitive. The goal is to preserve a clean porcelain field while giving the cook confidence that a pan is centered correctly.
Think in terms of cookware, not just burner count. A two-zone layout can be ideal for a minimalist island used for sauces, pasta, and occasional entertaining. A four-zone system offers greater flexibility for a household that routinely cooks multiple dishes at once. The best configuration depends on the size of the island, the available electrical capacity, and whether another cooking appliance exists elsewhere in the kitchen.
Use compatible magnetic cookware designed for the system. Induction heats the pan directly, so cookware material and base construction affect responsiveness and efficiency. InvisaCookware provides a reliable starting point because it is made for through-surface induction use. A favorite pan may work, but it should be tested rather than assumed compatible.
Design the Cabinet Interior Like an Appliance Zone
The countertop may look almost untouched, but the cabinet below carries real technical responsibilities. The induction modules require dedicated electrical planning, appropriate ventilation, and space for the equipment. Treat this area with the same respect you would give a premium wall oven or built-in refrigeration system.
Electrical requirements vary by system size. One- and two-burner designs may fit a smaller electrical plan, while larger layouts require more capacity. Your electrician should review the exact model specifications early, verify the dedicated circuits, and coordinate wire routing before cabinets are closed. Do not rely on a generic outlet plan or assume an existing cooktop circuit will be appropriate.
Ventilation is equally important. The system needs airflow within the cabinet according to its installation instructions. That can affect drawer placement, shelf locations, and whether the island is better suited to open storage, a shallow utility drawer, or a carefully planned service compartment beneath the unit. A concealed appliance still needs accessible service space.
For projects with a sculptural waterfall island, these details become even more valuable. The exterior stays pure, while the interior is organized around performance and maintainability.
Build Safety and Comfort Into the Specification
Gas cooking brings flame, combustion heat, and a visible appliance footprint. Conventional induction removes the flame but still places a glass-top cooktop in the middle of the counter. Through-surface induction takes another step by keeping the technology below the porcelain.
The cookware becomes hot because it is the vessel receiving induction energy. The surrounding countertop area remains far cooler than a traditional radiant cooking surface, though the area under and near a hot pan can warm from transferred heat. That makes cleanup easier and supports a more comfortable island experience for families, especially when children or pets are nearby. It does not eliminate the need for normal kitchen awareness around hot cookware.
Performance should not be treated as a design compromise. A properly specified invisible induction system can reach cooking temperatures around 400°F and bring water to a boil in under two minutes under the right conditions. Induction also directs energy into the pan rather than heating a gas grate or radiant element first, supporting efficiency figures in the 83% to 90% range.
Those numbers are meaningful, but real-world results still depend on pan size, cookware construction, zone selection, electrical supply, and what is being cooked. The value is fast, controlled heat paired with an island that does not look like a cooktop when it is not in use.
Let the Island Work After Dinner
The strongest hidden cooking surface designs consider the hours when nobody is cooking. A wide porcelain island can shift from sauté station to buffet line without covering burners or working around grates. It can support a catered event, hold flowers and serving boards, or become the center of a casual dinner party.
Integrated features can extend that flexibility. Through-counter wireless charging, for example, keeps phones powered without adding a countertop puck, cord, or outlet strip to the visual field. It is a small detail, but it reinforces the same principle: technology should support the room without taking over the room.
This approach is particularly effective in homes where the kitchen is visible from the living area. Instead of seeing a conventional cooktop from across the room, guests see porcelain, cabinetry, and the lines chosen by the architect. The kitchen feels less like a workstation when it is at rest, while remaining fully capable when dinner starts.
Avoid the Two Costly Shortcuts
The first shortcut is choosing the countertop purely on appearance. A slab needs to be verified for the cooking system, and the approved installation process needs to be followed exactly. Substituting an unapproved material or improvising the underside construction can create performance, warranty, and durability concerns.
The second is treating invisible induction as a late-stage appliance decision. By the time cabinetry, electrical, and slab fabrication are complete, the easiest options may no longer be the best ones. Invisacook California helps homeowners and trade professionals coordinate the product choice, porcelain compatibility, electrical needs, and installation details before those decisions become expensive to change.
A hidden cooking surface is most successful when it is designed as part of the island from the first drawing. Give the porcelain the room to make its statement, give the equipment the conditions it needs to perform, and the kitchen can offer both an unforgettable first impression and a better everyday place to cook.


Leave a comment
This site is protected by hCaptcha and the hCaptcha Privacy Policy and Terms of Service apply.